Introduction
Apache Airflow is a workflow management platform, allowing you to develop, schedule, and monitor complex workflows. In the field of data science, a common use of Apache Airflow is to execute ETL (Extract-Transform-Load) processes, and we will see an example of that later. In my experience, the benefit of this tool is (1) forcing you to think/develop in logical, pipeline-oriented mindset, (2) allowing you to monitor every step the pipeline with comprehensive logging.
Apache Airflow is an orchestrator of DAGs (Directed Acyclic Graphs), which are collections of tasks to perform and are organized in a way that shows relations and process dependencies. For example,
A --> B --> C
Or a slightly more complex example:
In either case, you see a clear order of operations (indicated by arrows). In Airflow, these DAGs are defined in Python files and we will see some examples of this later in the post.
Docker Compose Configuration File
We will first start by creating a docker-compose.yml file for the project. In this example, our docker-compose.yml will contain 3 linked services:
- Apache Airflow GUI
- Apahce Airflow Scheduler
- Postgres Database
version: "3.7"
services:
    postgres:
        image: postgres:9.6
        environment:
            - POSTGRES_USER=${POSTGRES_USER}
            - POSTGRES_PASSWORD=${POSTGRES_PASSWORD}
            - POSTGRES_DB=airflow
        volumes:
            - ./data/postgres:/var/lib/postgresql/data
        ports:
            - "5432:5432"
    webserver:
        image: puckel/docker-airflow:latest
        container_name: airflow
        restart: always
        depends_on:
            - postgres
            - scheduler
        command: bash -c "airflow initdb && airflow webserver"
        env_file:
            - .env
        volumes:
            - ./dags:/usr/local/airflow/dags
            - ./test:/usr/local/airflow/test
            - ./plugins:/usr/local/airflow/plugins
            - ./logs:/usr/local/airflow/logs
            - ./data:/usr/local/airflow/data/
            - ./scripts:/usr/local/airflow/scripts
            - ./airflow.cfg:/usr/local/airflow/airflow.cfg
            # - ~/.aws:/usr/local/airflow/.aws
        ports:
            - "8080:8080"
        healthcheck:
            test: ["CMD-SHELL", "[ -f /usr/local/airflow/airflow-webserver.pid ]"]
            interval: 30s
            timeout: 30s
            retries: 3
    scheduler:
        image: puckel/docker-airflow:latest
        restart: always
        depends_on:
            - postgres
        command: scheduler
        env_file:
            - .env
        volumes:
            - ./dags:/usr/local/airflow/dags
            - ./logs:/usr/local/airflow/logs
            - ./data:/usr/local/airflow/data/
            - ./airflow.cfg:/usr/local/airflow/airflow.cfg
        healthcheck:
            test: ["CMD-SHELL", "[ -f /usr/local/airflow/airflow-scheduler.pid ]"]
            interval: 30s
            timeout: 30s
            retries: 3
The postgres service is a database used to store the various metadata and logs produced by Airflow. This way you can see the logs of previous DAG executions. Additionally, because we mount the data directory, this data will presist beyond the containers life. The next service is webserver which is the actual Apache Airflow interface, which we will be running on port 8080. Finally, we allow the scheduler for Apache Airflow reside within a separate service, which allows us to execute DAGs on a schedule using cron jobs.
How to Run Your Container(s)
To start up your Apache Airflow stack, and assuming you are cd‘d into the proper directory, execute the following command in Terminal/Command Prompt:
docker-compose up
If this is your first time running the command, it will take a while to execute as it is downloading all of the required dependencies. Note, the next time you run this command, you will not have to wait as long.
Apache Airflow
Once your stack is succesfully running, which you will know if you see the following printed by airflow AND scheduler:
  ____________       _____________
 ____    |__( )_________  __/__  /________      __
____  /| |_  /__  ___/_  /_ __  /_  __ \_ | /| / /
___  ___ |  / _  /   _  __/ _  / / /_/ /_ |/ |/ /
 _/_/  |_/_/  /_/    /_/    /_/  \____/____/|__/
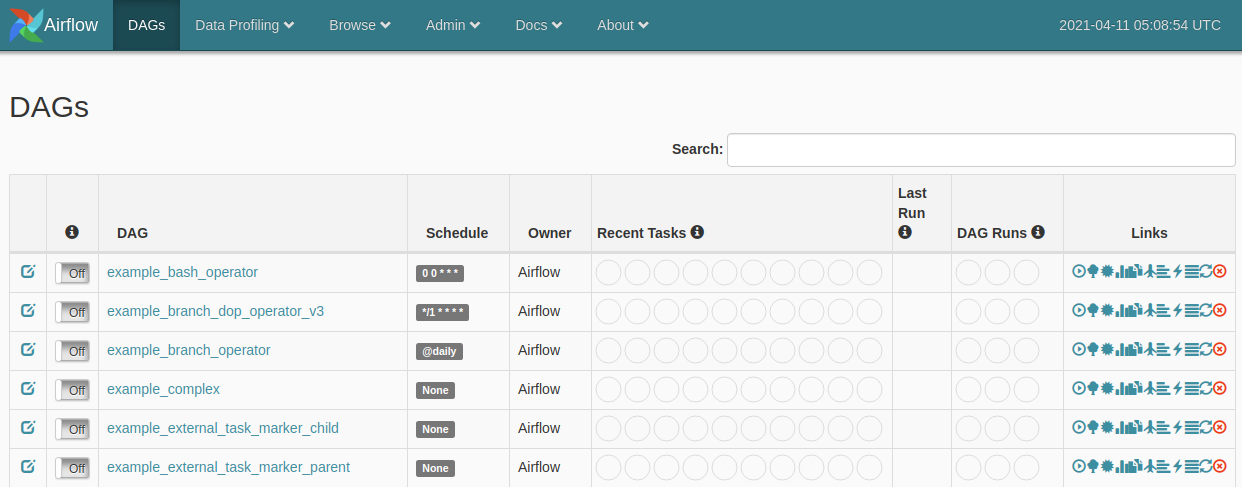
Once you see things running, visit localhost:8080. You should immediately see the following screen:

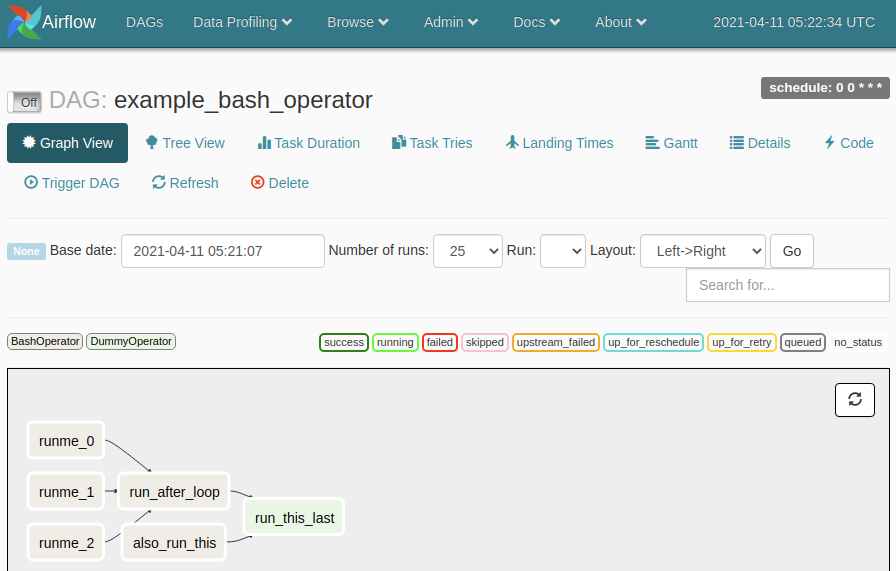
In the main table are example DAGs that—optionally—come with your Apache Airlfow—defined in the environment variables. Let’s try to play around with the example_bash_operator dag. When you click on the DAG, you’ll be redirected to a “Tree View” of the process—I prefer to look at the “Graph View”, so I recommend clicking on that button.

Understanding the Example DAG
Immediately we can see that there are six nodes in this graph, runme_0, runme_1, runme_2, run_after_loop, also_run_this, and run_this_last. Additionally from the arrows, we can tell that runme_0, runme_1, and runme_2 are allowed to run in parallel, and only upon all three completing, should run_after_loop execute. Asynchronously, also_run_this is allowed to execute. After run_after_loop and also_run_this complete, the next step is to execute run_this_last.
Before we execute this DAG, let’s look at the code that defines this DAG (click on the “Code” tab).
...
dag = DAG(
    dag_id='example_bash_operator',
    default_args=args,
    schedule_interval='0 0 * * *',
    dagrun_timeout=timedelta(minutes=60),
    tags=['example']
)

run_this_last = DummyOperator(
    task_id='run_this_last',
    dag=dag,
)

# [START howto_operator_bash]
run_this = BashOperator(
    task_id='run_after_loop',
    bash_command='echo 1',
    dag=dag,
)
# [END howto_operator_bash]

run_this >> run_this_last

for i in range(3):
    task = BashOperator(
        task_id='runme_' + str(i),
        bash_command='echo "" && sleep 1',
        dag=dag,
    )
    task >> run_this

# [START howto_operator_bash_template]
also_run_this = BashOperator(
    task_id='also_run_this',
    bash_command='echo "run_id= | dag_run="',
    dag=dag,
)
# [END howto_operator_bash_template]
also_run_this >> run_this_last
Let’s digest this one chunk at a time, you start by defining the DAG object, including the id and the schedule (in this example, run at midnight, in cron syntax).
dag = DAG(
    dag_id='example_bash_operator',
    default_args=args,
    schedule_interval='0 0 * * *',
    dagrun_timeout=timedelta(minutes=60),
    tags=['example']
)
Next, we are going to define each task in the DAG, note the order in which you define the tasks, don’t indicate the order in which they execute—those are indicated by >>. The first task defined is run_this_last, which is DummyOperator which does nothing,
run_this_last = DummyOperator(
    task_id='run_this_last',
    dag=dag,
)
Next is a BashOperator called run_this, which as the name implies, executes a Bash command. Additionally, it is given the task_id run_after_loop, which is the name that appears in the graph. In this case, it should print the value 1 to console.
run_this = BashOperator(
    task_id='run_after_loop',
    bash_command='echo 1',
    dag=dag,
)
Then they define the order to execute run_this and run_this_last. Specifically, only execute run_this_last AFTER run_this—whenever that may be.
run_this >> run_this_last
Next, they define a series of BashOperators called runme_{...} that each do a simple print and sleep. Furthermore, they define that each task should run BEFORE run_this.
for i in range(3):
    task = BashOperator(
        task_id='runme_' + str(i),
        bash_command='echo "" && sleep 1',
        dag=dag,
    )
    task >> run_this
Finally, they specify another tasks called also_run_this that does a templated print and runs BEFORE run_this_last.
also_run_this = BashOperator(
    task_id='also_run_this',
    bash_command='echo "run_id= | dag_run="',
    dag=dag,
)

also_run_this >> run_this_last
Apache Airflow will then aggregate all of the relations defined (e.g. A >> B, C >> D, etc.) and construct the process diagram you saw above.
Execute the Example DAG
To run this process, you need to click two buttons.
- The light switch (either on the home page or the specific DAG page), which allows the process to be triggered by the scheduler service.
- You can either wait for the schedular to do its thing, or you can force an execution by pressing the
Trigger DAGbutton (with the play button).
Slowly you’ll see each process get highlighted gray (queued), then light green (running), then finally—assuming it works—dark green (success). However, if any process fails, it will be highlighted in red (failed). If your screen isn’t updating, click the refresh icon near the processes.
View Logs
To view the logs for any of the tasks, click on it and click View Log. For example, the logs for run_after_loop, looks like this:
*** Reading local file: /usr/local/airflow/logs/example_bash_operator/run_after_loop/2021-04-11T05:46:52.672001+00:00/1.log
[2021-04-11 05:47:10,870] {taskinstance.py:655} INFO - Dependencies all met for <TaskInstance: example_bash_operator.run_after_loop 2021-04-11T05:46:52.672001+00:00 [queued]>
[2021-04-11 05:47:10,895] {taskinstance.py:655} INFO - Dependencies all met for <TaskInstance: example_bash_operator.run_after_loop 2021-04-11T05:46:52.672001+00:00 [queued]>
[2021-04-11 05:47:10,895] {taskinstance.py:866} INFO -
--------------------------------------------------------------------------------
[2021-04-11 05:47:10,895] {taskinstance.py:867} INFO - Starting attempt 1 of 1
[2021-04-11 05:47:10,895] {taskinstance.py:868} INFO -
--------------------------------------------------------------------------------
[2021-04-11 05:47:10,905] {taskinstance.py:887} INFO - Executing <Task(BashOperator): run_after_loop> on 2021-04-11T05:46:52.672001+00:00
[2021-04-11 05:47:10,907] {standard_task_runner.py:53} INFO - Started process 36947 to run task
[2021-04-11 05:47:10,952] {logging_mixin.py:112} INFO - Running %s on host %s <TaskInstance: example_bash_operator.run_after_loop 2021-04-11T05:46:52.672001+00:00 [running]> f1db98b1e7fa
[2021-04-11 05:47:10,968] {bash_operator.py:82} INFO - Tmp dir root location:
 /tmp
[2021-04-11 05:47:10,969] {bash_operator.py:105} INFO - Temporary script location: /tmp/airflowtmpasazv8s4/run_after_loopo4uqf_c_
[2021-04-11 05:47:10,969] {bash_operator.py:115} INFO - Running command: echo 1
[2021-04-11 05:47:10,973] {bash_operator.py:122} INFO - Output:
[2021-04-11 05:47:10,974] {bash_operator.py:126} INFO - 1
[2021-04-11 05:47:10,974] {bash_operator.py:130} INFO - Command exited with return code 0
[2021-04-11 05:47:10,983] {taskinstance.py:1048} INFO - Marking task as SUCCESS.dag_id=example_bash_operator, task_id=run_after_loop, execution_date=20210411T054652, start_date=20210411T054710, end_date=20210411T054710
[2021-04-11 05:47:20,855] {logging_mixin.py:112} INFO - [2021-04-11 05:47:20,855] {local_task_job.py:103} INFO - Task exited with return code 0
Other DAG Operators
In the example_bash_operator example, we only saw two operators BashOperator and DummyOperator, however Apache Airflow has support for many other operators. For the full list click HERE, and here are some notable examples:
PythonOperatorDockerOperatorEmailOperator
In the next example, I will show you how to use the PythonOperator.
Example ETL DAG
Next we will create a very simple ETL DAG on the iris dataset. To create a custom dag, just add a new python file to the dags folder. In this example, here is a dag called iris_etl.py:
from datetime import timedelta, datetime
import os
import urllib
from airflow.models import DAG
from airflow.operators.python_operator import PythonOperator
import pandas as pd

dag_args = {
    "owner": "kaimibk",
    "email": "kaimibk@gmail.com",
    "start_date": datetime(2021, 4, 10),
    "email_on_failure": True,
    "email_on_retry": True,
    "retries": 1,
    "retry_delay": timedelta(minutes=3),
}

dag = DAG(
    dag_id="Simple_Iris_ETL",
    default_args=dag_args,
    schedule_interval=None,
    tags=["example"]
)

_data_root = "/usr/local/airflow/data/"

def extract_data(source_path: str, destination_path: str) -> None:
    """Extract data from URL and save to local file

    Args:
        source_path (str): URL of data file
        destination_path (str): File directory to write to
    """
    print("Downloading Data...")
    urllib.request.urlretrieve(source_path, destination_path)


t1 = PythonOperator(
    task_id="extract_data",
    python_callable=extract_data,
    op_kwargs={
        "source_path": "https://gist.githubusercontent.com/curran/a08a1080b88344b0c8a7/raw/0e7a9b0a5d22642a06d3d5b9bcbad9890c8ee534/iris.csv",
        "destination_path": os.path.join(_data_root, "data.csv")
        },
    dag=dag
)

def _to_categorical(species: str) -> int:
    """Convert species to a integer category

    Args:
        species (str): iris species

    Returns:
        int: encoded species
    """
    if species=="setosa":
        return 0
    elif species=="versicolor":
        return 1
    elif species=="virginica":
        return 2
    else:
        raise "InvalidSpecies"

def transform_data(data_path: str, **kwargs) -> pd.DataFrame:
    """Transform the data (only encode the species label)

    Args:
        data_path (str): Location of csv file to transform
    """
    print("Transforming Data...")
    df = pd.read_csv(data_path)
    print(df.head())

    print("Encoding Species Label")
    df["species"] = df["species"].apply(_to_categorical)

    print(df["species"].head())

    kwargs["ti"].xcom_push("df", value=df)

t2 = PythonOperator(
    task_id="transform_data",
    python_callable=transform_data,
    op_kwargs={
        "data_path": os.path.join(_data_root, "data.csv")
        },
    dag=dag,
    provide_context=True,
)

def load_data(destination_path: str, **kwargs) -> None:
    """Save the data into a csv file

    Args:
        destination_path (str): File directory to write to
    """
    ti = kwargs["ti"]
    df = ti.xcom_pull(key=None, task_ids="transform_data")

    print(f"Saving Dataframe to {destination_path}")

    df.to_csv(destination_path)

t3 = PythonOperator(
    task_id="load_data",
    python_callable=load_data,
    op_kwargs={
        "destination_path": os.path.join(_data_root, "data_transform.csv")
    },
    dag=dag,
    provide_context=True,
)

t1 >> t2 >> t3
This DAG is very simple, it does the following:
- Extract: Download the iris dataset and write to a csv file.
- Transform: Read the csv file and perform a basic transformation (numerically encoding the species column). Transfer the data to the next process using xcom.
- Load: Write the transformed data to another csv file.
Additionally, if you want this process to run on a schedule, you can modify the schedule in the default_args, see HERE.
Spinning Down Your Containers
When you are done with your jupyter container, ctrl+c in the terminal where you ran the docker-compose up. To ensure the containers fully stop gracefully, execute:
docker-compose down
Link to Repository
For the full code for this tutorial see: